Easy Diagram on How to Hook Up a 12volt Single Pole Switch

Ever live in a house that had lights you couldn't turn off and on by a switch? No? Me either. Let's keep that streak up. This blog post is going to teach you how to install 12v lights and switches in your DIY Camper
NOW AVAILABLE: 12V Branch Circuit Guidebook https://shop.explorist.life/shop/all-products/solar-wiring-diagrams/12v-branch-circuits/
Quick note before we get started. This is just one part of an overarching "How to Install a DIY Camper Van Electrical System" series. If you've just stumbled on this article directly without seeing that, there are likely some things we've already covered. If you want to check out that step by step guide, you can do that here: https://www.explorist.life/diy-campervan-solar
Also, we have interactive solar wiring diagrams that are a complete, A to Z solution for teaching you exactly what parts go where, what size wires to use, fuse size recommendations, wire lug sizes, and all kind of other stuff to help save you time and frustration. You can check that out here: https://www.explorist.life/solarwiringdiagrams/
How to Wire 12V Camper Lights to a Battery
Although it is, indeed, possible to wire the lights directly to the positive and negative battery terminals, installing a complete electrical system into a DIY camper is going to involve moving the branch circuits (Lights, fans, USB outlets, etc) away from the battery bank. To do this, I recommend using a power distribution center like the WFCO WF-8950 (https://amzn.to/3kLk6gf). Here is how the WFCO WF-8950 distributes power:
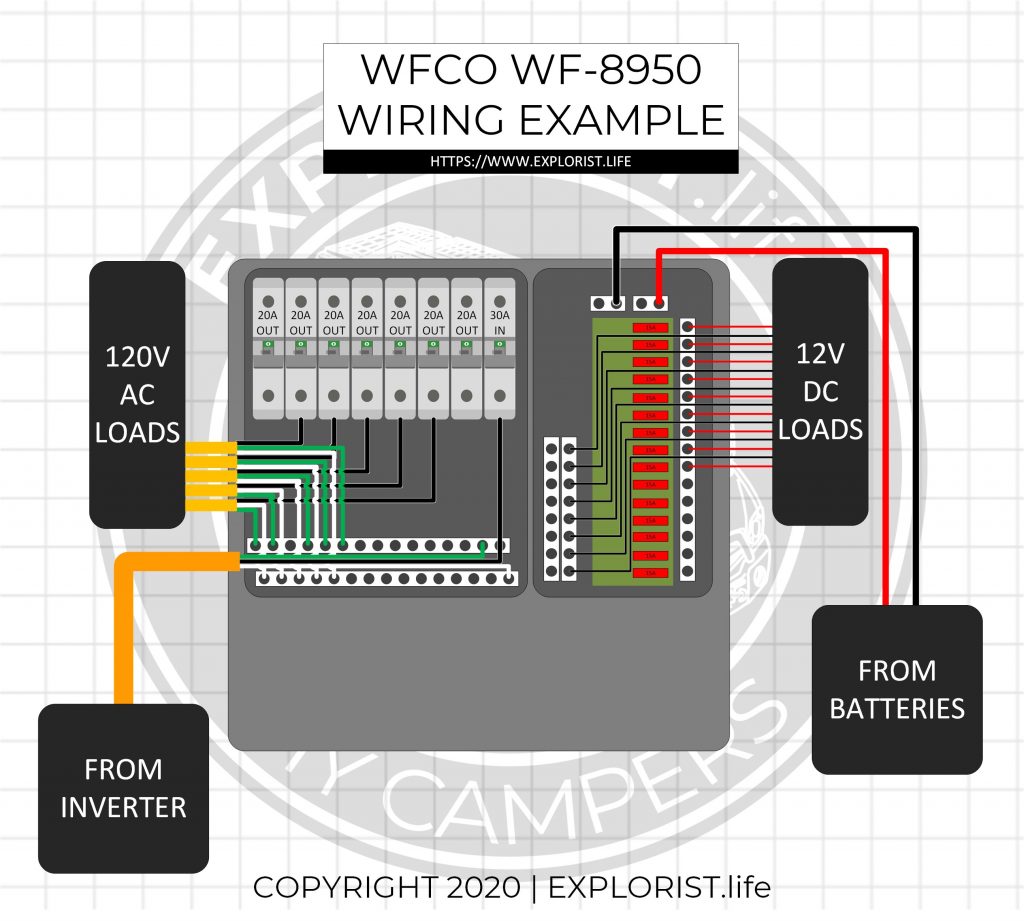
How to Wire a 12V Fuse Block to the Battery Bank
In all of the EXPLORIST.life solar wiring diagrams, I have integrated the WFCO WF-8950 into every one to deliver power to all of the 12V accessory runs. The following diagram highlights the path from which the 12V power distribution panel draws power from the battery bank. 12V power is drawn from the 12V Battery bank and gets distributed through the 12V Busbars (Victron Lynx Distributor, in this diagram) to the major components in the system. From the Lynx Distributor, power goes up the positive and negative wires to the DC side of the power distribution center where there are 15 different circuits ready to send power out through a positive and negative wire to each of the individual 12V branch circuits (lights, fans, usb outlets, etc).
How to Wire a 12V Power Distribution Panel (Video)
This was a very quick overview of how to wire a power distribution panel. If you need a more detailed overview, here is a full length blog post tutorial & video: https://www.explorist.life/how-to-wire-a-power-distribution-panel/
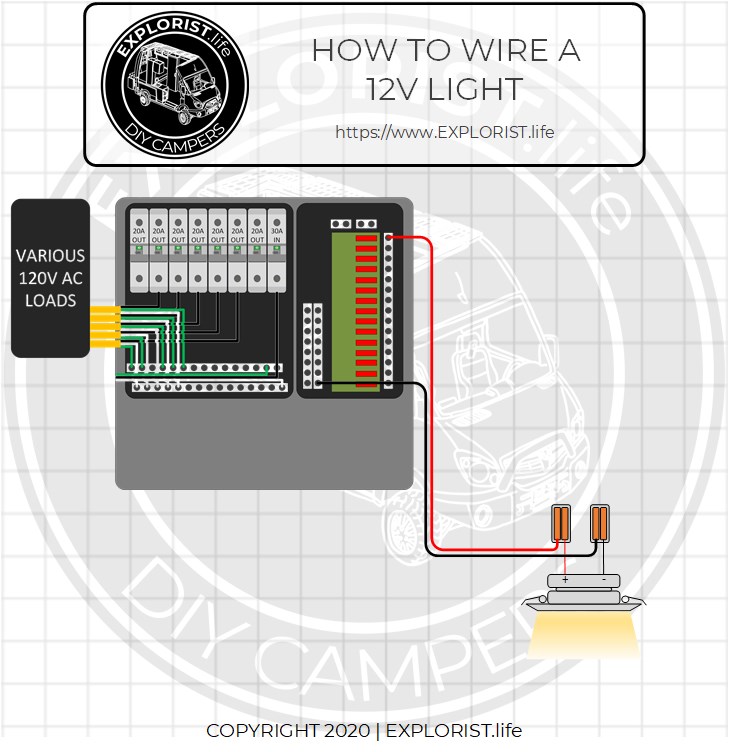
How to Wire a 12V Light
Wiring a 12V light from a 12V battery bank through a 12V fuse block is pretty straightforward. All that is required is to:
- Connect a positive wire to a fused positive terminal in the power distribution panel.
- Connect a negative wire to a terminal on the negative busbar in the power distribution panel.
- Connect the positive wire to the positive wire on the light by means of a lever nut.
- Connect the negative wire to the negative wire on the light by means of a lever nut.
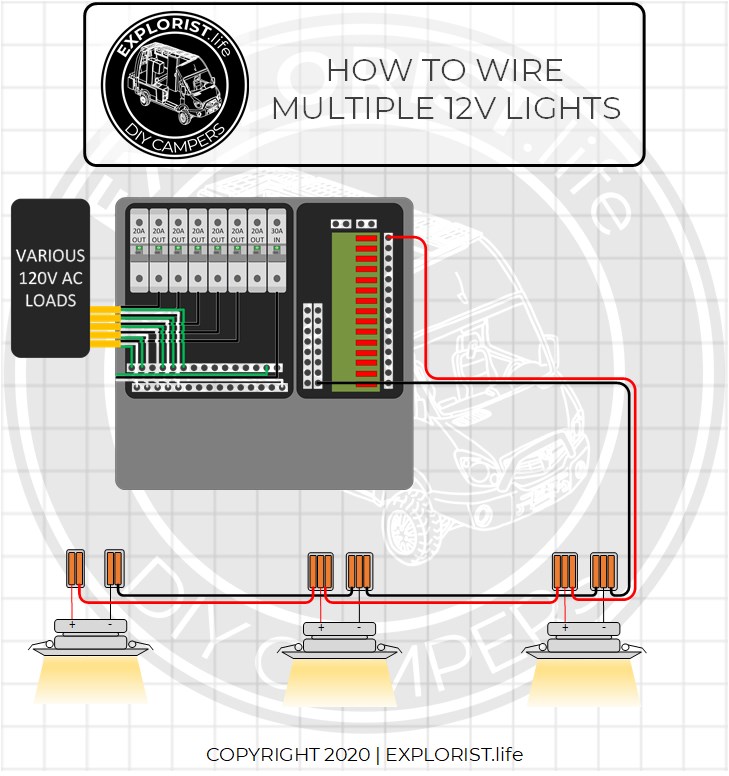
HOW TO WIRE MULTIPLE 12V LIGHTS TOGETHER
The previous diagram may be less than helpful because most people aren't wiring just a single light. Generally, multiple lights turning on at the same time is desired. Following the same steps as before, but add the following:
- Connect an positive wire to the lever nut connected to the positive wire on the 1st light, and run that to a lever nut connected to the positive wire on the 2nd light.
- Connect a negative wire to the lever nut connected to the negative wire on the 1st light and run that to a lever nut connected to the negative wire on the 2nd light.
- Repeat this process for as many lights as you have.
How to Install 12V Light Switches
Now that you know how power gets sent to a light or multiple lights from the 12V fuse block, it's time to learn how to wire a switch so you can turn the lights on and off as you wish. This section is going to cover lights that turn on and off from a single location. We will cover 2 way light switches that can control lights from multiple locations later in this post.
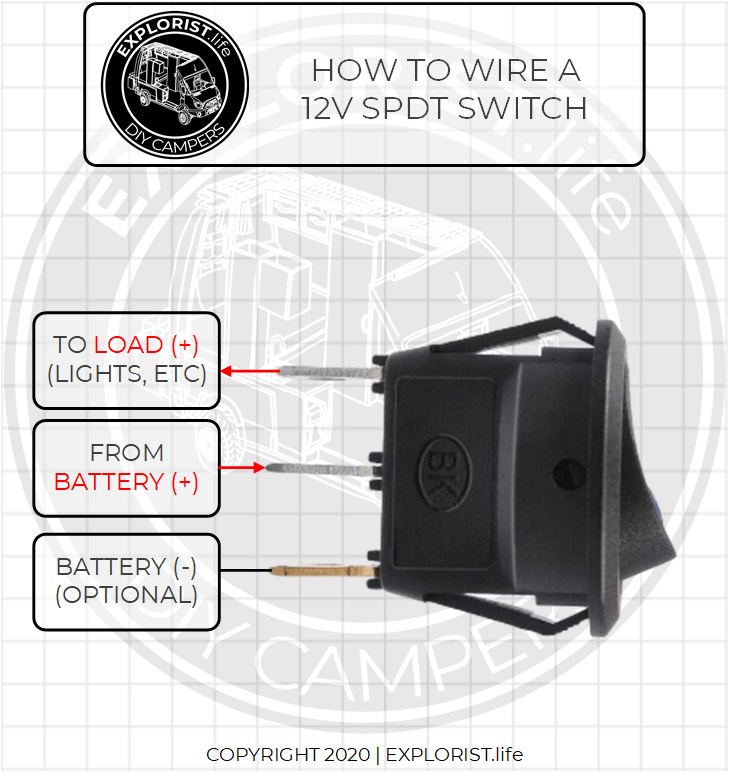
12v spst Light Switch Diagram
The standard 12V switch we are using to control lights from one location is a "Single Pole Single Throw", or commonly abbreviated "SPST". This is the most basic switch. It simply has an on an off position. There are three terminals on the back:
- The middle terminal will accept power from the power distribution panel.
- The top terminal will send power to the lights given the switch is on.
- The bottom terminal is the negative terminal. This simply allows the LED light on the switch to function depending on if the switch is on or off. If you do not wish for the little LED light built into the switch to operate, you can bypass the negative terminal on the back of the switch and not use it.
NOTE: In the rest of the diagrams shown, the Negative switch terminal will NOT be connected. The LED Light on the switch is quite bright and if these switches are located in the same location you are sleeping in, they are very annoying.
How does a 12v light switch work?
The standard 12V switch we are using to control lights from one location is a "Single Pole Single Throw", or commonly abbreviated "SPST". The switch simply 'breaks' or 'connects' the positive wire in the system allowing the power to either flow or not flow depending on if the switch is pushed or not. Here is an example of how the switch works in it's two positions to control a string of 3 lights:
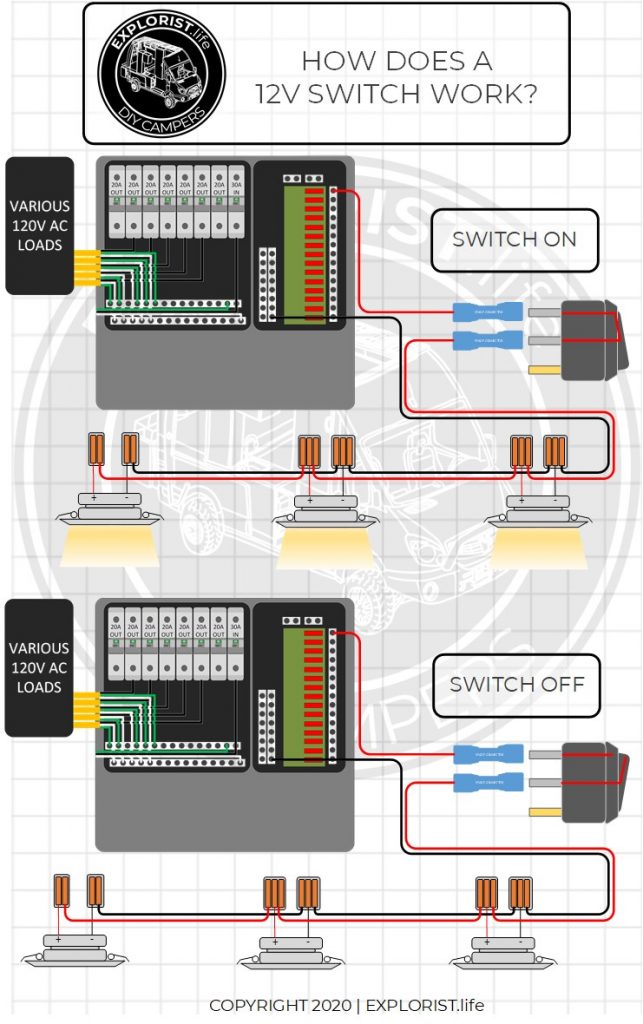
Notice that in this diagram the negative terminal of the switch is NOT connected which means the little led light in the switch will NOT be active.
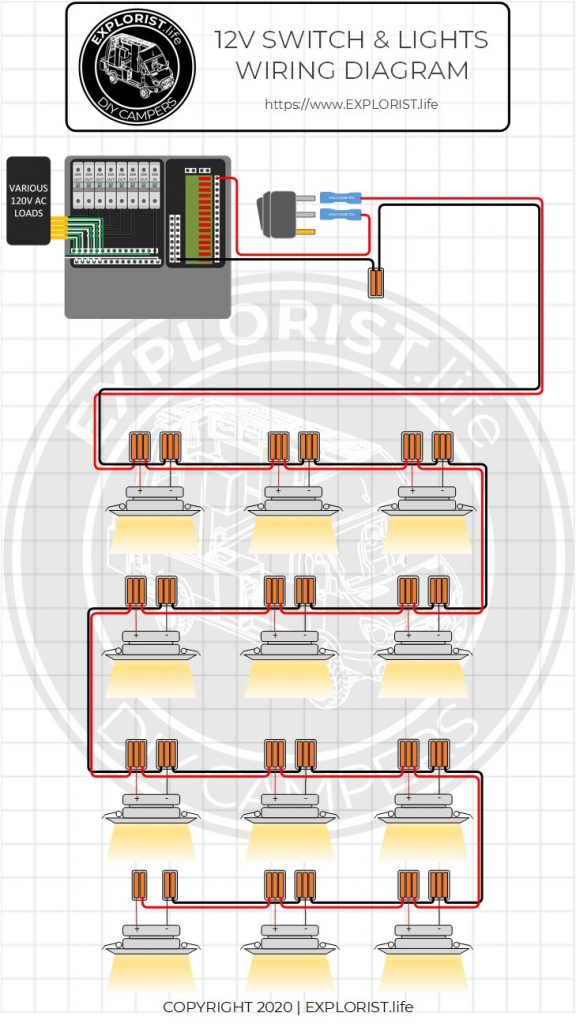
How to Wire Multiple 12V Lights to a Single Switch
Wiring multiple 12V lights to a 12V switch is just as simple as connecting the positives to positives and negatives to negatives and installing a SPST switch between the fuse box and the string of lights. The switch MUST be between the fuse box and the lights. Here is a 12v lights & switch wiring diagram that shows 12 lights controlled by a single switch:
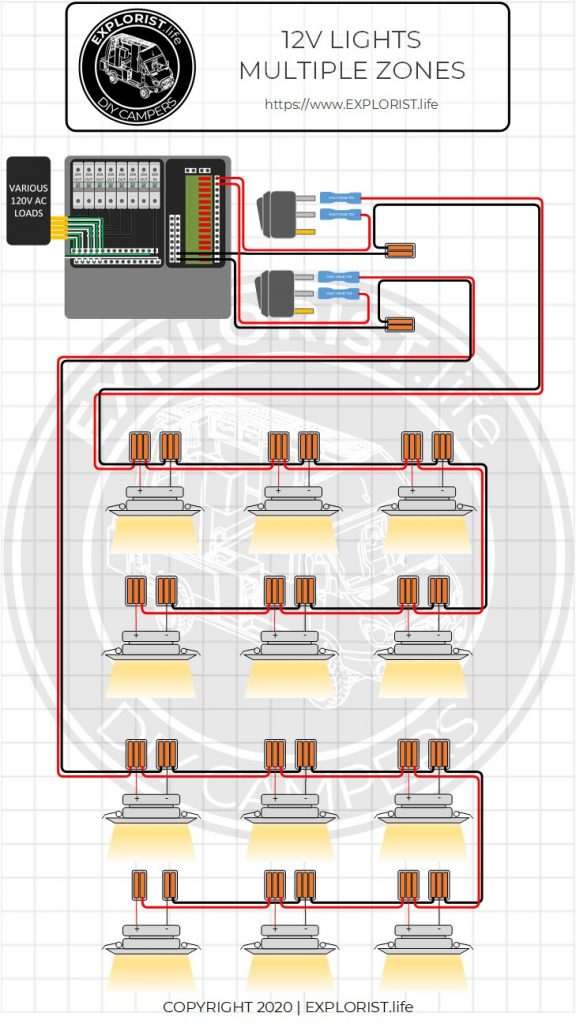
How to Wire Multiple 'Zones' of Lights
If you want to have multiple 'zones' of light in your camper, you can just 'copy-paste' the diagram from above down to the next fuse location in the distribution box. This would allow you to have the switches either in the same locations, or two seperate locations to control the multiple zones. Remember, though, this is showing one switch controlling one zone of lights. Here is how that would look:
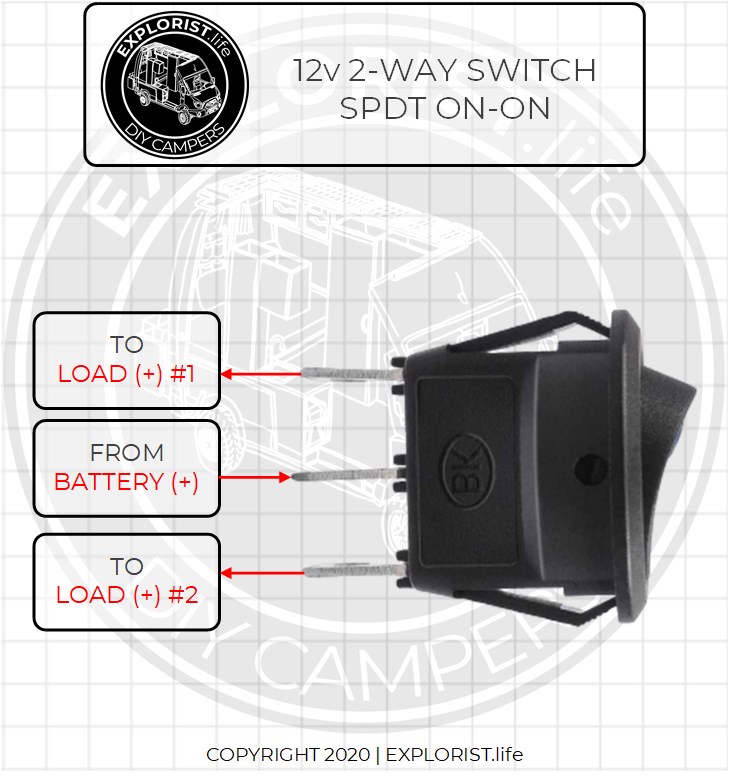
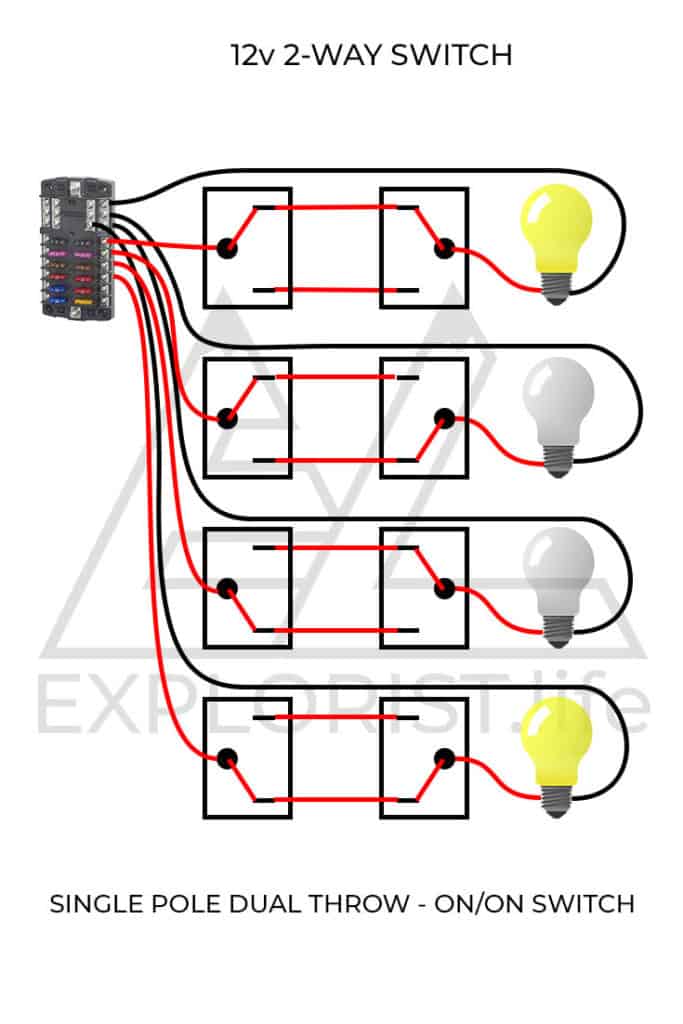
How to wire a 12v 2 way switch
The purpose of a 2 way switch is so that you can have a switch by your entry-way and another by, say, your bed so you can operate the same set of lights from two different locations.
It's VERY VERY important you get the right switch. The switch you are looking for is a 'Single Pole Double Throw – On/On' 12v switch. Here's how this switch functions:
12V Lights – 2 Way Switch Wiring Diagram
The diagram below shows how to hook 2 way switches together and how to connect them to a string of lights. The positive wire from the 12V Fuse block feeds power to the center terminal on a SPDT On-On switch. The 'Load 1' and 'Load 2' terminals of the SPDT On-On switch are then connected to the 'Load 1' and 'Load 2' terminals of the 2nd SPDT On-On switch in the 2nd location. From there, the center terminal sends power to the lights depending on the orientation of the switches.
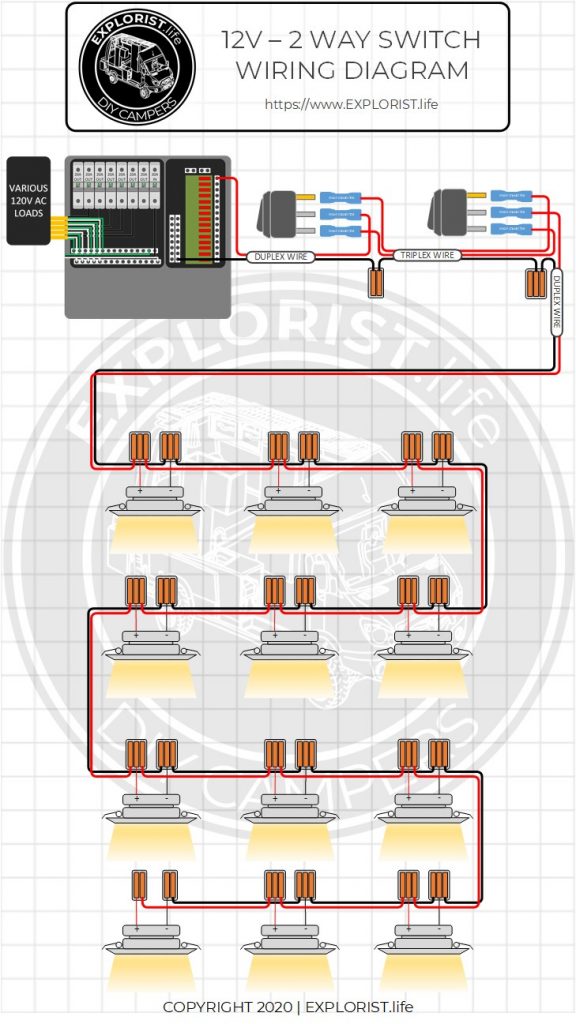
12V Lights – 2 Way Switch Parts List
Here is a list of parts shown in the above diagram:
Here is how the switch works in various positions:
Hopefully, you now know how to wire 12v lights and switches into your DIY Camper. If you have any questions, leave them in the comments below and subscribe for future updates.
Now that you know how to wire in a 12v switch and all of your lighting, it's time for a lesson on how to figure out what size and type of wire to use in your DIY camper van electrical system. Check that out here: https://www.explorist.life/what-wire-to-use-for-diy-camper-solar-system/
Everything that you are learning here is put to use in our FREE Interactive Solar Wiring Diagrams. If you haven't yet, check them out as they are a complete solution for a camper van electrical system. Check them out here: https://www.explorist.life/solarwiringdiagrams/
Remember, this is just one part of a full camper van electrical educational series. To see all of the individual guides, click here: https://www.explorist.life/diy-campervan-solar
Finally, If you found this guide helpful, It'd truly mean the world to us if you'd share it with somebody who can use it, pin it to pinterest for later reference, or share it to a facebook group when somebody has a question about this subject. Click the bubble in the lower right corner to subscribe to be notified of future updates and as always, leave any questions you've got in the comments below.
Source: https://www.explorist.life/how-to-wire-12v-lights-switches-2-way-switches-in-a-camper/
0 Response to "Easy Diagram on How to Hook Up a 12volt Single Pole Switch"
Post a Comment